

The Challenge Activities
Are you a little familiar with computational thinking? Great! Why not explore the hundreds of computational thinking activities provided by our digital education partners to make up your four activities! Check with your Teacher to see what they recommend would be the right level for you or just explore on your own. You can’t go wrong. If something isn’t working for you – just try another activity! Before you know it you’ll have computational thinking nailed!

Access DT Hub™
Activities

Access Hour of Code™ Activities

Access Grok Learning™ Activities

Access CS Unplugged™ Activities

Access MakeCode™ Activities

Access Code Club™ Activities
Beginners Activities
New to computational thinking? No worries! We’ve selected six activities that are perfect for beginners to complete the Challenge. Remember, you only need to complete four activities and you’ve completed the Commissioner’s Learn to Speak Robot Digital Challenge!
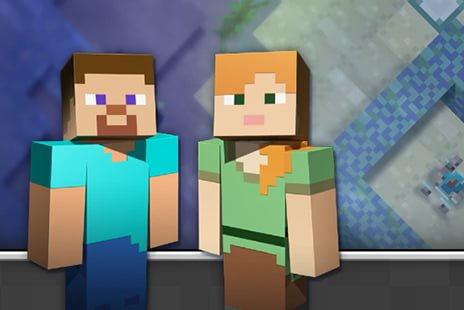
Coding with Minecraft®
Learn the basics of programming in familiar territory
Find out more
Get started with this beginner’s coding with a Minecraft lesson from Code.org’s Hour of Code™.
Watch a 2-minute intro video followed by a step-by-step introduction to coding using a Minecraft character.
Learn about algorithms
Find out more
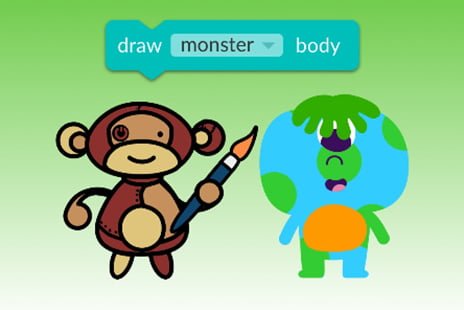
Make cute monsters
Australian Digital Technologies Curriculum approved lesson
Find out more
Sign in as a teacher to get free access to all the notes and support you need to run Grok Learning tutorials as a classroom activity and no software installation is required. All activities also contain extension suggestions for students who blast through.

FREE MICRO:BIT SIMULATOR
Code a flashing heart with no special equipment
Find out more
Don’t have a budget for physical robots or microchips? Microsoft have an entire, online based micro:bit simulator you can use for free. Simply click on the picture of the chip to make it do what it would in real life.

BINARY SECRET CODES
Find out more
Explore this CS Unplugged activity to find out how numbers can become something else: a necklace made out of beads that secretly spells your name or a code for writing secret messages.
If you have no idea what binary is spend 5 minutes getting up to speed with Math is Fun by Rod Pierce.

Code a dance party
Find out more
Use your creativity to code a choreographed dance performance with this Hour of Code™ activity from Code.org.
Take part with digital devices or try the unplugged version (no devices needed) as a class.

Design Thinking Process
Ever done Design Thinking before? No? Then this a great digital Challenge for you. You’re Challenge is to Design a toy or gadget for someone your age who is moving to Mars. You can do this using the FREE 3D design tools provided by Makers Empire or you can use pen and paper and draw your design idea onto your MAKE IT! Design Sheet.
Use the design thinking steps below to help you:
START HERE
TIP: click on each planet to explore the design thinking process and complete the Challenge!
STEP 1

STEP 2

STEP 3

STEP 4

STEP 5

STEP 1
Understand and Care
Learn about who you are helping
You are designing a toy or gadget for someone your age who is moving to Mars.
What would it be like to move to Mars? How will it be different from living on Earth, and how will it be the same?
Below is a video providing you with some information that could help. Feel free to do your own research to add to what you learn here too.
In this video former NASA astronaut, Pamela Melroy, talks about what it’s really like to be in outer-space.
Use books, internet, films and other sources of information to find out some interesting facts about Mars.
Here are a few to get you started:

Skies are pink and sunsets are blue
The opposite of skies on Earth

You can jump twice as high
And stay up in the sky for 2 seconds

One year = 687 days
When would you celebrate your birthday?
It’s expensive to take things there
It costs anywhere from thousands to millions of dollars just to take 1 kilogram of stuff up there

It can get very cold
Parts of Mars get down as low as minus 125 degrees C

The soil is red
And contains toxic chemicals

There is no air
95% carbon dioxide and no oxygen in the atmosphere

It has the highest mountain in our Solar System
Olympus Mons is 2.5 times higher than Mount Everest
STEP 2
Make a plan
The best designers figure out the exact problem they are trying to solve by thinking about the person they are designing for. To do this, think about the things a young person your age might like and how those things would work on Mars.
What does this young person like?
- Do they enjoy sport?
- Do they like to cook?
- Do they like reading?
- Do they like pets?
- Will they miss their friends and family when they go to Mars?
- Is there anything else you can think of that they might need..?
What will it be like for them in space / on Mars?
The ‘Understand and Care’ step will have given you some great ideas. You might want to create something that:
- Does not take up much room
- Has more than one purpose
- Works well with less gravity
- Is there anything else you can think of about how things will work on Mars that you need to consider…?
Now ask a question using your answers to both of these questions to help you create your unique design.
How might I design a toy or a gadget for someone my age that helps them [with something they like – eg. to cook] that [is good for space / Mars – eg. that does not take up much room]?
Just try putting some of your answers in the parts of the sentence they refer to above and see what you come up with.
This STEP 3
Have lots of ideas
Knowing what the problem you are trying to solve when designing your toy or gadget is key.
It’s time to come up with lots of design ideas – this is called ‘brainstorming’.
There are no right or wrong ideas when you are brainstorming.
The only rule is that there are no rules!
Let’s have a go…
Write on a piece of paper / draw / doodle / use a whiteboard / record your ideas in whatever way works best for you. Work as a group and call some of your ideas out. This will help everyone come up with even more ideas.
Stop when you have lots and lots of ideas. Look at them all and then decide which ideas are your favourite. A good way to find your top 3 ideas is to ask these questions:
- What idea is the most likely to work?
- What idea is so crazy it might just work?
- What idea are you most excited about developing?
Once you’ve chosen your top three ideas, you are ready to take the next step!
STEP 4
Make it
So now you have chosen your favourite three ideas it’s time to select one of these and then start designing? You are going to design (or make) something that shows others what your idea is all about – what it looks like and how it works. This is called a ‘prototype’.
For Space to Dream there are two ways to show the Commissioner your prototype.
You can choose your favourite way by choosing one of the ways below, and then following the steps provided.
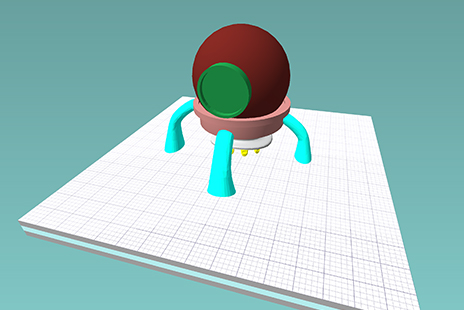
use FREE 3D DESIGN TOOLS
1. Your teacher will provide you with a blank ‘MAKE IT!’ Student Design Record.
2. Download the free version of 3D design software provided by Makers Empire.
3. Sign up to Makers Empire or login if you already have an account.
- Think of a username – do not use any information that could identify you.
- Think of a password – do not use anything someone could easily guess.
4. Write down your username on your ‘MAKE IT!’ Student Design Record. Once you are logged in, select the ‘Shaper’ tool.
5. Create your design in 3D – use the Pro tips to get the best result!
6. Click ‘Finish‘ Within the Maker’s Empire website make sure to Give your design a title including ‘SPACE TO DREAM’ at the front. (For example SPACE TO DREAM PET ROBOT). It is very important that you remember this step as this is how the Commissioner will find your design in the Maker’s Empire Gallery.
7. Use the ‘MAKE IT!’ Student Design Record to record all the details of your design, including your Makers Empire username.
8. If you use Makers Empire to create your design, you do not need to draw your design. But you can certainly draw it if you want to!
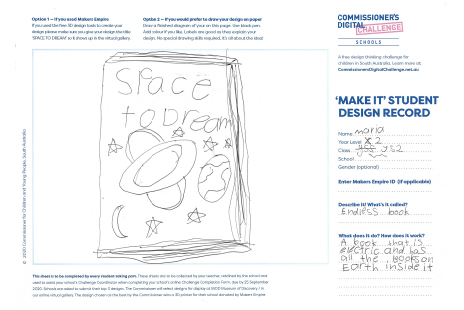
Draw Your Design
1. Your teacher will provide you with a blank ‘MAKE IT!’ Student Design Record.
2. Hand-draw your design onto the ‘MAKE IT!’ Student Design Record.
3. The ‘MAKE IT!’ Student Design Record asks you to give your design a name and to describe how it works.
4. Draw your design with black or other dark pen (as it will show up best when you are later asked to upload a scan your design).
5. Feel free to use colour to bring your design to life!
6. You may wish to use labels if that helps you explain your design and how it works.
7. Complete all the details asked for on your ‘MAKE IT!’ Student Design Record.
STEP 5
Can you make it better?
Share your design with other people your age and listen to what they have to say.
Do others like your design or are they coming up with some suggestions for ways they think you could make it even better?
If you used Makers Empire 3D tools – you can go back and edit your design via the ‘My Designs’ tab on the Makers Empire software.
If you drew your design and you decide to make a lot of changes you may wish to complete a new ‘MAKE IT!’ Student Design Record.
Once you have made any changes and have decided that you are happy with your design, hand your completed ‘MAKE IT!’ Student Design Record to your teacher.
Teachers will pass your Space to Dream design to your School’s Challenge Coordinator who will make sure it reaches the Commissioner in time!
FinishED?
Hand your finished ‘MAKE IT!’ Student Design Record to your teacher. They will submit it on your behalf.

The Challenge Activities
Have you ever done any systems thinking? Not sure what systems thinking is? Well then the Commissioner’s Zoom Out! Challenge is a good one for you.
There are three systems thinking activities for you to choose from. The activities are complementary, so you may even wish to do all three!
The systems thinking Challenge activities were created in collaboration with Grok Academy (formerly the Australian Computing Academy and Grok Learning). They are experts in digital learning which is why we’ve partnered with them on Zoom Out! Choose one or all three systems thinking activities below. Each activity takes approximately 5-10mins to complete!
ONLINE ACTIVITY:
SYSTEMS ARE EVERYWHERE
GROUP ACTIVITY:
CREATE A SYSTEM
GROUP ACTIVITY:
MAKE A KINDER SYSTEM
Acknowledgement of Country
We respectfully acknowledge and celebrate the Traditional Owners of the lands throughout South Australia and we pay our respects to their Elders – and to past, present and future generations of their children and young people.
Terms and Conditions
Contact Us
Phone +61 (08) 8226 3355
© Commissioner's Digital Challenge
Website by Education Web Solutions